搜索到
5
篇与
的结果
-
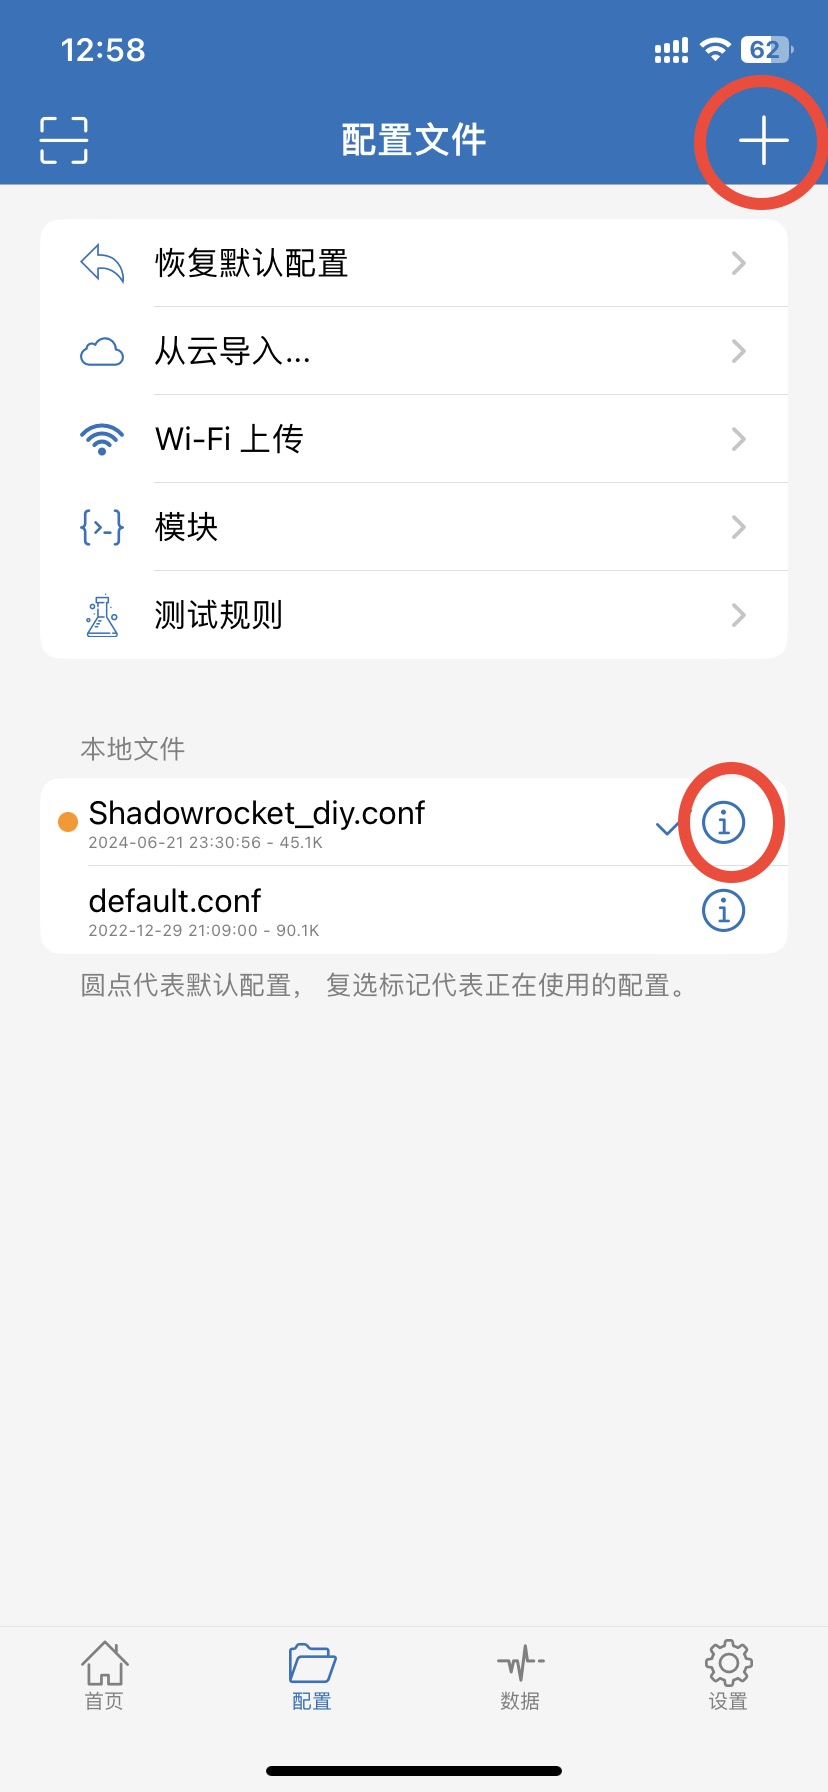
 Shadowrocket小火箭去APP启动页广告 1 下载配置文件白名单规则+去广告 https://raw.githubusercontent.com/justsee233/Shadowrocket-Rules/main/Shadowrocket_diy.conf直连+去广告(适用于没有科学节点) https://cdn.jsdelivr.net/gh/justsee233/Shadowrocket-Rules/Shadowrocket_direct_ad.conf在【配置】页点击右上角【+】,粘贴配置链接,点击【下载】。点击【配置】刚下载的Shadowrocket_diy.conf-【使用配置】,后续如果配置文件有更新可选择-【更新配置】。2 开启HTTPS解密2.1 点击配置文件Shadowrocket_diy.conf后面ⓘ - HTTPS解密 - 证书 - 生成新的CA证书 - 安装证书。2.2 手机设置 - 通用 - VPN与设备管理 - 已下载描述文件 - 安装。2.3 手机设置 - 通用 - 关于本机 - 证书信任设置 - 开启对应Shadowrocket证书信任。3 添加模块【配置】-【模块】-【右上角+】 粘贴模块链接添加APP启动页去广告融合ultra+ https://whatshub.top/module/adultraplus.moduleYouTube去广告 https://whatshub.top/module/YouTubeAd.sgmodule去广告规则每天有更新,自行选择【更新模块】,更新模块也会刷新配置文件的规则集。提示:若某个模块时而生效时而失效,请检查其他模块的主机名前是否添加了%APPEND%,没有添加会导致其他模块失效。4 添加GeoIP文件【设置】-【GeoLite2数据库】-【国家】-【URL】填写下面链接 -【更新】,三选一 推荐精简版https://raw.githubusercontent.com/Loyalsoldier/geoip/release/Country.mmdb精简版 GeoIP,只包含 GEOIP,CN 和 GEOIP,PRIVATEhttps://raw.githubusercontent.com/Loyalsoldier/geoip/release/Country-only-cn-private.mmdbhttps://github.com/Hackl0us/GeoIP2-CN/raw/release/Country.mmdb5 手机ChatGPT将你可访问ChatGPT的节点名称后面加上-WARP,配置文件会自动选择此节点访问OpenAI。或者点击配置文件Shadowrocket_diy.conf后面ⓘ-【代理分组】-手动指定OpenAI或WARP节点 的策略。6 免流节点和家庭内网访问如果家里路由为openwrt,可安装luci-app-v2ray-server搭建免流或回家节点,公网ipv4与ipv6都可。免流节点名称后缀添加-ml,回家节点名称后缀添加-home。如果为同一个节点后缀添加-ml-home即可。将【全球直连】指定为【免流节点】,可实现国外网站走正常代理,国内走免流节点,因为免流节点不支持TLS,可增加安全性。如需进局域网管理后台,将第一条规则修改为你当前局域网段,如下为京东云无线宝默认网段IP-CIDR,192.168.68.0/24,DIRECT7 最后小火箭开机启动:【设置】-【按需求连接】-【始终开启】更新规则:【配置】-Shadowrocket_diy.conf-【使用配置】会更新加载所有规则集。配置文件Shadowrocket_diy.conf后面ⓘ-【规则集URL】-点击相关规则单个更新提示:如果是❌表示规则集更新加载异常,可重复在【配置】-Shadowrocket_diy.conf-【使用配置】感谢相关规则配置收集于网络,以下排名不分先后。https://github.com/deezertidalhttps://github.com/Loyalsoldier/surge-ruleshttps://github.com/privacy-protection-tools/anti-ADhttps://github.com/blackmatrix7/ios_rule_script
 -
Ubuntu&qinglong青龙 1.安装宝塔(可选)官网教程链接命令:wget -O install.sh http://download.bt.cn/install/install-ubuntu_6.0.sh && sudo bash install.sh2.docker部署2.1 docker安装curl -sSL https://get.docker.com/ | sh站内详细文章链接2.2 拉取镜像docker pull whyour/qinglong2.3 启动容器复制下列命令在ssh执行(先安装docker)注:$PWD请修改为实际你想安装的路径(否则表示当前路径)docker run -dit \ -v $PWD/ql/config:/ql/config \ -v $PWD/ql/log:/ql/log \ -v $PWD/ql/db:/ql/db \ -v $PWD/ql/repo:/ql/repo \ -v $PWD/ql/raw:/ql/raw \ -v $PWD/ql/scripts:/ql/scripts \ -p 5700:5700 \ --name qinglong \ --hostname qinglong \ --restart unless-stopped \ whyour/qinglong:latest浏览器输入:ip:5700 即可访问青龙面板初始化设置注意:云主机需在安全组开放5700端口,ubuntu防火墙开启端口 sudo ufw allow 5700/tcp3.青龙设置与拉库3.1拉库3.1.1 KingRan开源库链接国内网络:ql repo https://ghproxy.com/github.com/KingRan/JDJB.git "jd_|jx_|jdCookie" "activity|backUp" "^jd[^_]|USER|utils|function|sign|sendNotify|ql|JDJR"国外网络:ql repo https://github.com/KingRan/JDJB.git "jd_|jx_|jdCookie" "activity|backUp" "^jd[^_]|USER|utils|function|sign|sendNotify|ql|JDJR"3.1.2 ccwav资产通知增强版和CK检测开源库链接不包含sendNotify:ql repo https://github.com/ccwav/QLScript2.git "jd_" "NoUsed" "ql|utils" 包含sendNotify:ql repo https://github.com/ccwav/QLScript2.git "jd_" "NoUsed" "ql|sendNotify|utils"3.1.3 Zy143L的wskey转换开源库链接完美网络:ql repo https://github.com/Zy143L/wskey.git "wskey"国内网络:ql repo https://ghproxy.com/github.com/Zy143L/wskey.git "wskey"使用建议 修改定时计划 15 /8 默认为8小时15分执行一次 请按需修改3.2 安装库脚本依赖,添加依赖 3.3 设置wskey青龙面板-环境变量-添加变量,变量名: JD_WSCK 参数: pin=xxxx;wskey=xxxx; # 注意分号 不要用中文分号!iPhone抓取方法链接
-
docker安装 1.脚本自动安装官方脚本curl -fsSL https://get.docker.com | sh国内daocloudcurl -sSL https://get.daocloud.io/docker | sh2.docker命令启动:sudo systemctl start docker开机启动:sudo systemctl enable docker状态:sudo systemctl status docker版本:docker -v运行hello-world 映像验证 Docker Engine 是否已正确安装。sudo docker run hello-world3.CentOS官方指导安装链接使用存储库安装,在新主机上首次安装Docker Engine之前,需要设置Docker存储库。之后可以从存储库安装和更新Docker。设置存储库安装yum-utils包(提供yum-config-manager 实用程序)并设置稳定存储库。 sudo yum install -y yum-utils sudo yum-config-manager \ --add-repo \ https://download.docker.com/linux/centos/docker-ce.repo安装 Docker 引擎,最新版本的 Docker Engine 和 containerd sudo yum install docker-ce docker-ce-cli containerd.io4.Ubuntu官方指导安装链接设置存储库,更新apt包索引并安装包以允许apt通过 HTTPS 使用存储库: sudo apt-get update sudo apt-get install \ ca-certificates \ curl \ gnupg \ lsb-release添加Docker官方的GPG密钥:curl -fsSL https://download.docker.com/linux/ubuntu/gpg | sudo gpg --dearmor -o /usr/share/keyrings/docker-archive-keyring.gpg安装 Docker 引擎,更新apt包索引,安装最新版本的Docker Engine和containerd sudo apt-get update sudo apt-get install docker-ce docker-ce-cli containerd.io
-
-